
All items on the price list come from the current Line Items, therefore Line Items must be set up before you can establish customer price lists.
You can have unlimited number of price lists and a customer can use more than one price list. But a job can only have one price list associated with it. It is this price list that is used when the job is invoiced so all items on a ticket (rental and labor) need to be on the price list before the job can bill. The only exception to that rule is Ticket Misc. Items where you have the option to add items not on a price list.
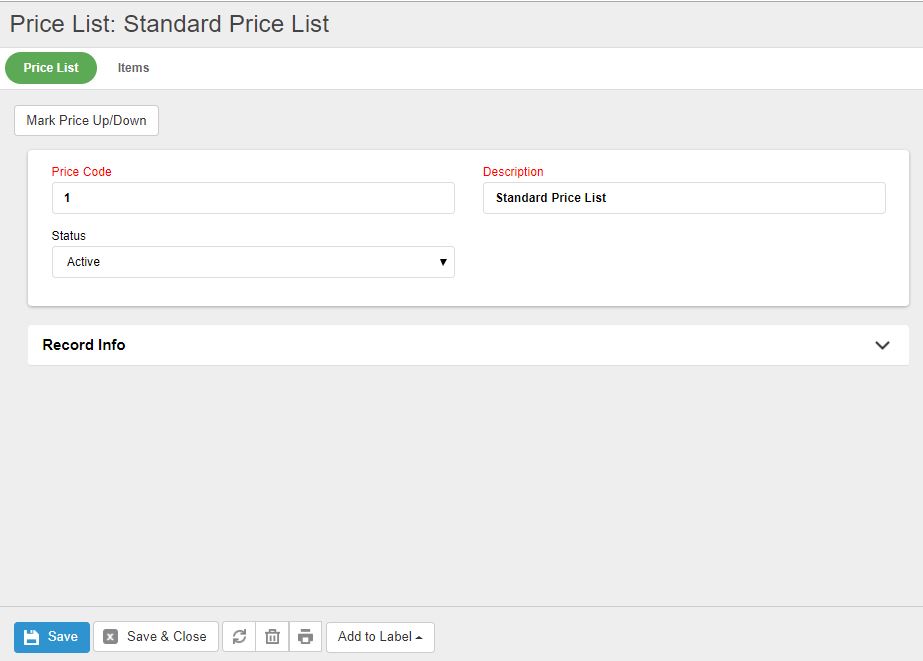
Price Code: The price code is an alpha-numeric field that you need to enter a unique value into. It can be just be a number sequence, or based on part of a customer name (i.e. ABC100).
Description: The name of the price list is what users will see in the various areas where they select a price code.
Status: All price list start as Active, but you can Inactivate a price list if you are no longer using it. If a price list is created from a quote or you want it to be specific to a job, the status will be set to Job Price List and will not be available to other jobs.
Once the price list 'header' is created, next you enter the line items you want on the specific price list.
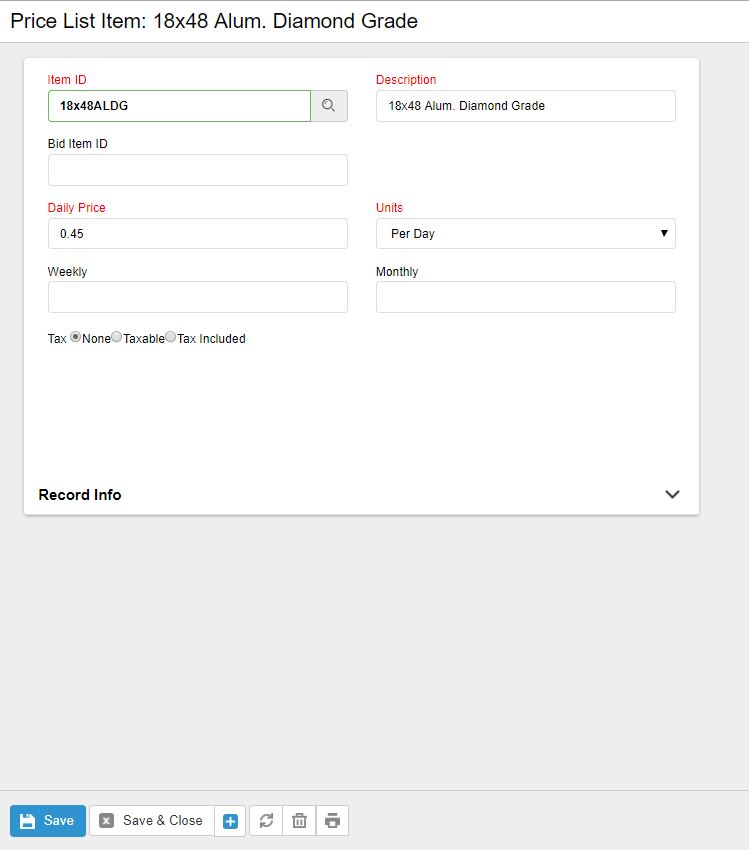
Item ID: Enter a Item ID by using the binoculars to search for the proper item. The Price Code and Item ID must be a unique combination or you will get a message about a duplicate index.
Description: The description will default to the line item description, but you can change it. This is the description that will print on the customer invoice. Keep this in mind as it provides you the ability to keep generic line items but allows you to customize the invoice description the customer sees (i.e. perfect for adding contract bid item#).
Bid Item ID: This would only be used for contract or quoted jobs where you need to reference the customer’s bid#. This field only appears on the invoice format for contracts which is very summarized. The other option is to add this bid item# into the description.
Price: Enter the price that you will charge per unit of measure. You can enter up to 4 decimal places.
Units: Select a Unit of Measure from the drop down list. This list of available Units is setup by your Administrator. Since billing is currently done on daily basis, this will not determine how the item is billed (i.e. weekly/monthly).
Tax: You need to mark whether the item is not taxable (None), Taxable or Tax Included. Use the space bar to toggle the button. Be aware that Tax Included will still charge sales tax, but it will be included in the price of the item. The invoice will not separate out the tax, but on the Sales reports, the tax will have been pulled out and recorded separately. And it will exported to your accounting software properly.
FR (flat rate) Equipment Amount: If the item is a Flat Rate or Lump Sum item and includes equipment, you can enter the portion of the price that relates to equipment. This will allow the system to calculate the sales tax and labor amount and report them separately on the invoice.
0 Comments